Hostinger LiteSpeed Cache Settings (Best Configuration for Maximum Speed)
🚀 Best LiteSpeed Cache Settings for Hostinger
If your website is hosted on Hostinger, one of the best ways to improve speed is by configuring the LiteSpeed Cache plugin correctly.
LiteSpeed Cache works directly with LiteSpeed servers, providing server-level caching and advanced performance optimization.
In this guide, I’ll show the best LiteSpeed Cache settings for Hostinger to help your website achieve faster loading speeds and better Core Web Vitals scores.
⚙️ Step 1: Install LiteSpeed Cache Plugin
First, install the plugin.
How to Install
1️⃣ Login to WordPress dashboard
2️⃣ Go to Plugins → Add New
3️⃣ Search for LiteSpeed Cache
4️⃣ Click Install → Activate
Once activated, the plugin automatically connects with LiteSpeed server caching.
🧠 Step 2: Enable Cache Settings
Go to:
LiteSpeed Cache → Cache
Recommended configuration:
✔ Enable Cache – ON
✔ Cache Logged-in Users – OFF
✔ Cache Commenters – ON
✔ Cache REST API – ON
✔ Cache Login Page – ON
These settings enable page caching, which reduces server processing time.
⚡ Step 3: Browser Cache Settings
Navigate to:
LiteSpeed Cache → Cache → Browser
Recommended settings:
✔ Browser Cache – ON
✔ Browser Cache TTL – 31557600 seconds
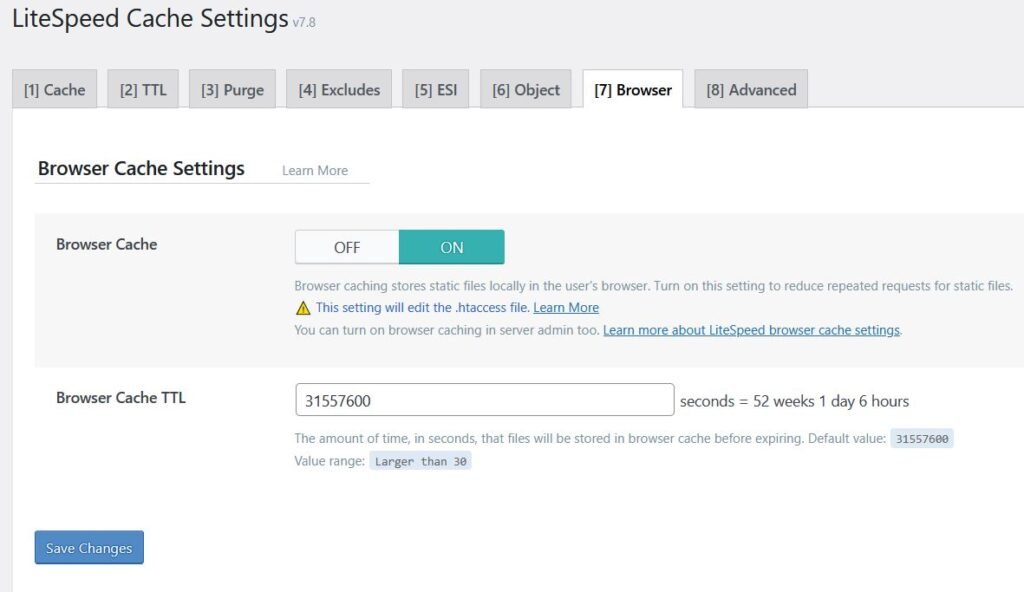
This allows browsers to store static files locally, reducing load times for returning visitors.
🔧 Step 4: Page Optimization Settings
Go to:
LiteSpeed Cache → Page Optimization
Recommended configuration:
✔ CSS Minify – ON
✔ JS Minify – ON
✔ HTML Minify – ON
✔ Combine CSS – ON
✔ Combine JS – ON
✔ Lazy Load Images – ON
These settings reduce file sizes and improve loading performance.
🖼️ Step 5: Image Optimization
Large images can slow down WordPress websites significantly.
Using LiteSpeed Cache you can:
✔ Compress images
✔ Convert images to WebP format
✔ Enable lazy loading
This reduces page weight and improves loading speed.
🗄️ Step 6: Database Optimization
WordPress databases often contain unnecessary data such as:
• post revisions
• auto drafts
• spam comments
• expired transients
Navigate to:
LiteSpeed Cache → Database
Then run database cleanup regularly.
🌍 Step 7: Enable CDN Integration
Using a CDN helps deliver website content faster to global visitors.
One of the most popular CDN services is:
• Cloudflare
CDN reduces latency and improves page loading speed worldwide.
📊 Step 8: Test Your Website Speed
After applying the settings, test website performance using tools like:
• Google PageSpeed Insights
• GTmetrix
These tools show detailed performance metrics including:
✔ Largest Contentful Paint (LCP)
✔ First Contentful Paint (FCP)
✔ Total Blocking Time (TBT)
🎯 Final Thoughts
Configuring LiteSpeed Cache properly can significantly improve WordPress performance on Hostinger.
When combined with image optimization, database cleanup, and CDN integration, LiteSpeed Cache can help your website achieve fast loading speeds and better SEO rankings.
❓ FAQ – LiteSpeed Cache Settings
Yes, LiteSpeed Cache is a free WordPress plugin designed specifically for LiteSpeed servers.
Yes. Hostinger uses LiteSpeed servers, so the LiteSpeed Cache plugin works perfectly with its infrastructure.
Yes. Features like file minification, lazy loading, and caching help improve Core Web Vitals scores.