Hostinger VPS Setup Guide (Step-by-Step for Beginners – 2026)
Hostinger VPS Setup Guide (Step-by-Step for Beginners – 2026)
If your website is getting slower or handling more visitors, it’s time to upgrade to a VPS on Hostinger.
Don’t worry if you’ve never used VPS before — in this guide, I will show you everything step-by-step in the simplest way possible.
👉 By the end of this guide, you will have:
- Your VPS ready
- WordPress installed
- Domain connected
- Website live 🚀
🧠 What is VPS (Simple Explanation)
Think of VPS like this:
- Shared hosting = sharing a room with many people
- VPS = your own private room
👉 That means:
✔ Faster speed
✔ No disturbance from others
✔ More control
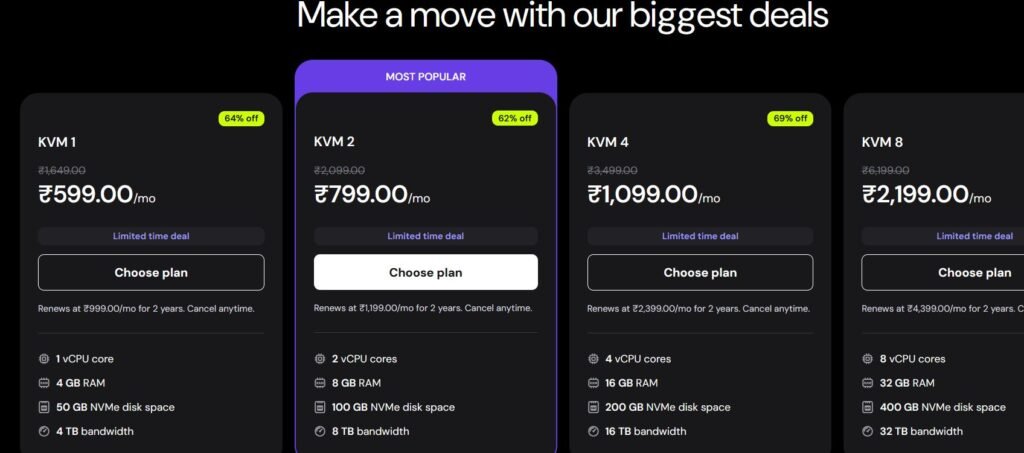
🧾 Step 1: Buy a VPS Plan
1️⃣ Login to your Hostinger account
2️⃣ Go to VPS Hosting
3️⃣ Choose a plan
👉 Beginner recommendation:
- 2 GB RAM
- 1–2 CPU cores
✔ Click Buy Now
✔ Complete payment
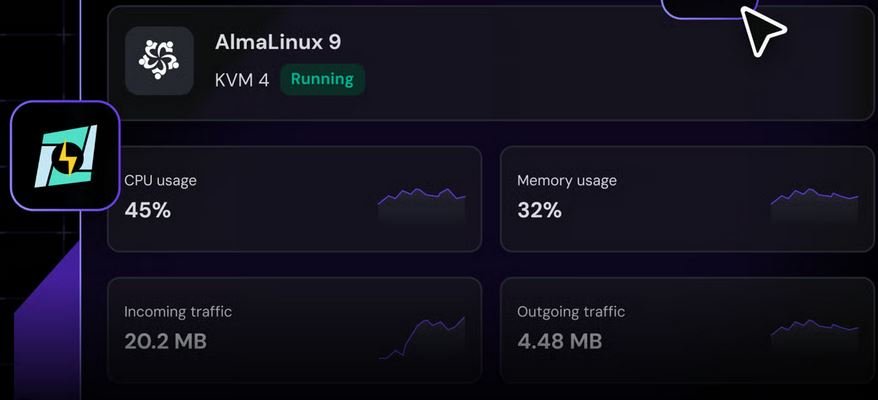
⚙️ Step 2: Open Your VPS Dashboard
After buying:
1️⃣ Go to your Hostinger dashboard
2️⃣ Click VPS
3️⃣ Click Manage
You will see:
- Server IP address
- Username (root)
- Password
👉 Keep this safe (we need it next)
🔐 Step 3: Connect to Your VPS (Very Easy Way)
We will connect using SSH.
For Windows Users:
Use PuTTY
For Mac/Linux:
Use Terminal
👉 Simple Connection Command
ssh root@your-server-ip
👉 Example:
ssh root@123.45.67.89
Now:
✔ Press Enter
✔ Type password
✔ Press Enter
👉 Done! You are connected 🎉
🧰 Step 4: Install CyberPanel (Easiest Method)
Instead of doing everything manually, we use a control panel.
👉 Best option: CyberPanel (FREE + beginner-friendly)

👉 Run This Command
sh <(curl https://cyberpanel.net/install.sh)
Now follow on-screen steps:
Choose:
1️⃣ Install CyberPanel
2️⃣ Select OpenLiteSpeed
3️⃣ Set admin username & password
4️⃣ Wait 5–10 minutes
👉 Installation will complete automatically
🌐 Step 5: Open CyberPanel Dashboard
After installation, open this in browser:
https://your-server-ip:8090
👉 Example:
https://123.45.67.89:8090
Now:
✔ Login using admin details
🌍 Step 6: Add Your Website (Domain Setup)
Inside CyberPanel:
1️⃣ Click Websites → Create Website
2️⃣ Enter:
- Domain name (yourdomain.com)
- PHP version
3️⃣ Click Create
👉 Your website is now created 🎉
📝 Step 7: Install WordPress
Now install WordPress easily:
1️⃣ Go to Websites → List Websites
2️⃣ Click Manage
3️⃣ Click Install WordPress
Fill details:
✔ Site name
✔ Username
✔ Password
👉 Click Install
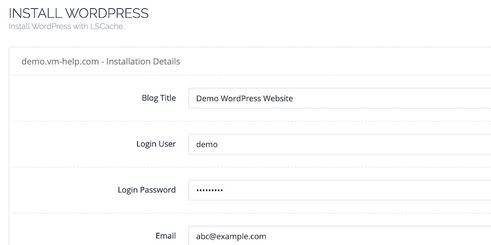
✔ Done! Your WordPress site is LIVE 🚀
🔗 Step 8: Connect Domain (Important)
If your domain is not connected:
1️⃣ Go to domain DNS settings
2️⃣ Add A Record:
- Type: A
- Value: Your VPS IP
👉 Save changes
⏳ Wait 10–30 minutes
🔒 Step 9: Enable SSL (HTTPS)
Inside CyberPanel:
1️⃣ Go to SSL → Manage SSL
2️⃣ Select domain
3️⃣ Click Issue SSL
👉 Your site becomes secure 🔐
⚡ Step 10: Speed Optimization (VERY IMPORTANT)
Now optimize your site for speed.
Install:
- LiteSpeed Cache
Enable:
✔ Cache
✔ Image optimization
✔ Lazy load
👉 For full setup, check:
Hostinger WordPress Optimization Guide
🌐 Step 11: Add CDN (Optional but Powerful)
Use:
This helps:
✔ faster global speed
✔ protection from attacks
📊 Step 12: Test Your Website Speed
After setup, test your site:
• GTmetrix
• Google PageSpeed Insights
👉 Aim for:
✔ Fast loading
✔ Good Core Web Vitals
🎯 Final Result
Now you have:
✔ VPS server ready
✔ WordPress installed
✔ Domain connected
✔ SSL enabled
✔ Optimized website
👉 You just built a powerful hosting setup from scratch 💪
❓ FAQ (Beginner Friendly)
No. Just follow steps — no coding required.
Around 15–30 minutes
Yes, much faster and more stable.
Related Post
👉 Optimization Guide
👉 LiteSpeed Settings
👉 WooCommerce Guide